
Rough tops on letters and keychains: find the cause and get it smooth

The name keychain comes out with streaks all over the letters, while a smooth plate in the same profile looks great. Plenty of recipes circulate for this, like a 0.2 nozzle, top at 35 mm/s and "just one wall", and each one attacks a different cause. Applying them all at once may even fix it, but you won't know what did the job, and you pay in machine time on every part from then on.
That is why each cause in this guide comes with a test that confirms or rules it out. Change one thing at a time and compare using the same part.
The first test doesn't use any filament
Slice the part, open Preview, choose Line Type under Color Scheme and drag the vertical bar to the last layer of the letters. Look from above, up close, at the spot that comes out rough on the printed part.
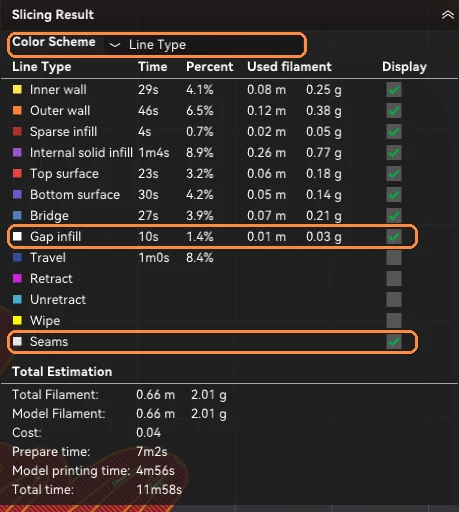
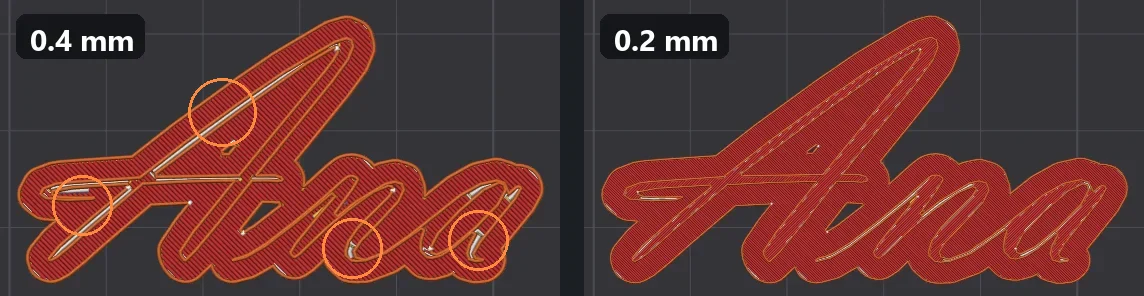
Look for a line that is missing, broken or squeezed. A white Gap infill line on its own is not a diagnosis: it is the infill the slicer planned. It becomes a suspect when it lands exactly where your part comes out rough.
What we measured in the slicer
We built an "Ana" keychain in a thin cursive font, 5 cm wide with letters raised 1.2 mm, and sliced each variation in Bambu Studio, for a P2S with PLA Basic. The last column shows the toolpath lengths on the last layer of the letters.
| Setting | Total time | Filament | Toolpaths on the letter top |
|---|---|---|---|
| 0.4 nozzle, 0.20mm Standard profile | 11 min 59 s | 2.0 g | outer wall 335 mm, top surface 131 mm, gap 59 mm |
| Only the wall generator set to Arachne | 12 min 17 s | 2.0 g | outer wall 300 mm, top surface 144 mm, gap 4 mm |
| Arachne and a 0.30 mm wall line | 12 min 49 s | 2.0 g | outer wall 318 mm, top surface 251 mm, gap 12 mm |
| Only top surface at 35 mm/s, acceleration 800 | 12 min 40 s | 2.0 g | same as the first row |
| Outer wall, gap and top surface at 50 mm/s | 13 min 5 s | 2.0 g | same as the first row |
| 0.2 nozzle, 0.14 layer | 27 min 3 s | 1.8 g | inner wall 612 mm, outer 332 mm, top surface 28 mm, gap 19 mm |
The time includes the roughly 7 minutes of printer prep. These numbers came from the slicer: they show what each attempt costs, not how much each one smooths. Your own machine answers that.
Two conclusions already hold for this kind of part:
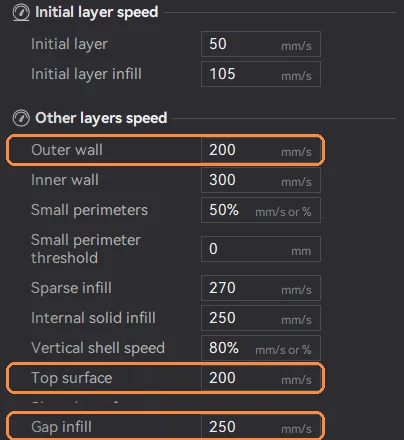
- Changing only the Top surface gets you little. It was 25% of the toolpath on the last layer. The outer wall, at 200 mm/s in the default profile, was 64%, and the gap infill, at up to 250 mm/s, was 11%.
- Testing is cheap; the fine nozzle is expensive. Arachne added 18 seconds and, with a 0.30 mm wall line, 50 seconds. The 0.2 nozzle more than doubled the print time, and that cost comes back on every unit you sell.
On a wider letter, or on a smooth plate, the Top surface weighs a lot more. That is why the preview comes first.
Cause by cause: how to confirm
Letter too thin for the nozzle
What it looks like: rough curves and tips, with gaps or squeezed plastic, while the wide parts of the letter look fine.
Test that confirms it: in the preview, the line disappears, breaks or gets squeezed in that same spot. Then compare in the slicer with the Arachne generator, which varies the line width to fit the space. The preview only shows the path that was generated: if it looks whole and the letter is still bad, print a version with the stroke thickened in the model, keeping the profile. If it improves, the thickness was part of the problem.
What to do: use Arachne, thin the wall line to 0.30 mm, thicken the letter in the model or pick a bolder font. The 0.2 nozzle comes in when none of that is enough. In our example, in 11% of the letter's area two 0.42 mm lines can't fit side by side; with 0.30 mm it's 8%; with 0.22 mm, practically none.
Lowering the layer height doesn't fix this, because the line width is what draws the letter. @unipedia3d printed the same keychain at 0.20 and 0.08 mm layers: it took 20 and 35 minutes, and the letters came out with the same detail.
High speed on what shows
What it looks like: waves on the edges and uneven lines on top, with no gap in the preview.
Test that confirms it: locate the defect in Line Type and check in Color Scheme Speed that the change really reached that spot. Print the same part with the outer wall, gap and top surface at 50 mm/s, keeping the acceleration. If it improves, go back to changing one at a time to find which one was the culprit: lowering all three together only tests the set.
Too much plastic
What it looks like: tall lines and grooves on top, with a feeling of excess material.
Test that confirms it: run the Flow Rate calibration with the same spool and the same nozzle. Test Top surface flow ratio at 0.95 on a single copy only if the roughness matches the Top surface in the preview, because that setting only acts there. Measuring a 20 mm square with calipers is only a clue: that measurement also changes with material shrinkage and XY compensation.
Wet filament
What it looks like: a dull, uneven top, with bubbles, popping at the nozzle and strings.
Test that confirms it: bubbles and popping are clues. The decisive test is printing the same part, with the same spool, before and after drying. Switching spools changes other variables, like brand and color. Temperatures and times are in the guide to drying filament.
Dirty or worn nozzle
What it looks like: defects that come back on every part, even with dry filament.
Test that confirms it: repeat the same part, with the same dry spool and the same profile, after cleaning the nozzle. If it improves, it was a clog. If it persists, try a good nozzle of the same diameter: improving only after the swap points to the nozzle assembly, without proving it was worn.
Too little support under the top
What it looks like: marks that follow the pattern of the infill, and little pinholes on top.
Test that confirms it: in the preview, go down at the spot of the defect to where the solid shell meets the sparse infill. Then compare the same part with a thicker top and the same infill. If the marks follow that grid and disappear, it is confirmed. Pinholes alone aren't enough, because they also show up with under-extrusion.
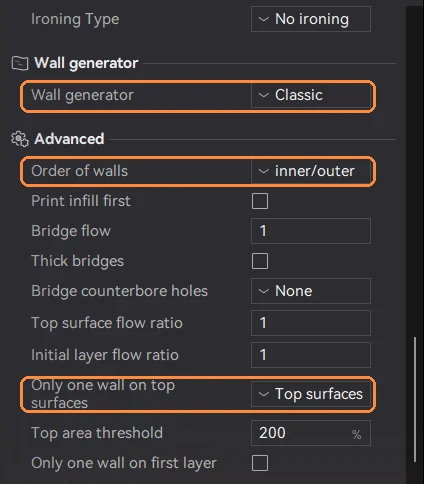
Order of walls
What it looks like: a rounded or bulging edge on the letter, with a good middle.
Test that confirms it: change only Order of walls to outer/inner and compare the letter's edge. If it improves, that proves the setting is useful for that geometry. On an overhang, the outer wall is printed without support, and the result can get worse.
Seam
What it looks like: a row of bumps, always at the same spot on the letters.
Test that confirms it: turn on Seams in the preview to see where the seam lands. Change Seam position to Back. If the bump moves along with it, that was the cause. Only then test scarf, which hides the join.
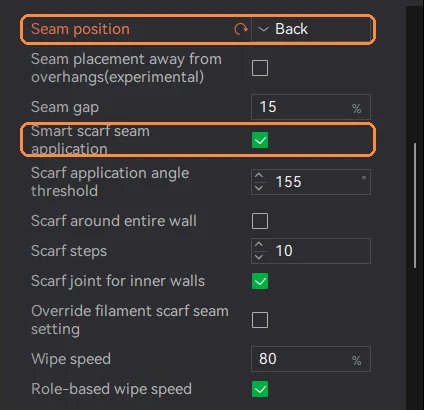
Check the position in the preview after slicing. A setting saved in the file can go back to the profile default when the project opens: it happened to us, and the seam ended up at the front of three test parts.
Bumps at corners and restarts
What it looks like: little beads where the nozzle changes direction or starts extruding again.
Test that confirms it: run the Flow Dynamics calibration, which is separate from Flow Rate, and compare the same part. If the bumps fall on the seam points, go back to the previous test.
Nozzle scraping on small islands
What it looks like: streaks on top, and letter tips that curl upward while printing.
Test that confirms it: watch the print up close or through the camera, on the last layers. If the tip rises and the nozzle hits it, test more cooling, keeping the same speed, to isolate the effect.
Rule out the base
If the base came out flat and stuck down, take that hypothesis off the list. If it lifted during the print, the nozzle can scrape the top even though the defect only shows up there. In that case, start with the guide to the first layer.
What order to test in, to spend little
- Preview, no printing: Line Type, Speed, Seams and the layer below the defect.
- Line failing: go straight to the geometry, with Arachne, a thinner line or a thicker letter.
- Line whole: print the speed comparison with the nozzle you already have.
- Still rough: dry the filament, clean the nozzle and run the calibrations.
- Only then: the 0.2 nozzle. If that was your problem, the part gets much slower, and the price has to keep up.
To compare without repeating the prep, put both versions on the same plate. In the Objects tab, many settings can be different for each part. That is how we made the domes in the layer height guide.
What the ready-made recipes really do
| Setting that circulates | What it changes | When it matters |
|---|---|---|
| Top surface at 35 mm/s and acceleration 800 | Only the toolpaths classified as Top surface | When the preview shows Top surface in the rough spot. In our example, 25% of the toolpath |
| Only one wall on top surfaces set to Not applied | Goes back to the normal wall count on top | In the example, it swapped the 131 mm of top surface for 118 mm of inner wall and 84 mm of gap. Confirm with a printed comparison |
| Order of walls set to outer/inner | The outer wall is printed first | Sharper edges on a flat part; can get worse on an overhang |
| Seam at Back and scarf on | Where the join lands and how it is made | When the bumps match the seam points in the preview |
| 0.2 nozzle with 0.14 layer | Thinner line, and its profile already comes out much slower | A letter that doesn't fit the 0.4 line. Costs more than double the time |
They can all work. What changes is knowing which one solves your case before carrying its cost on every part.
Frequently asked questions
Do I need to buy a 0.2 nozzle to make name keychains?
Not always. If the preview shows the whole line with the 0.4, or if Arachne fixes it, the fine nozzle would only make the part slower. It pays off when the letter really doesn't fit the 0.4 line and the font can't change. Before swapping, put the new time in the calculator, because the price changes with it.
Does ironing fix a rough top on small letters?
It can help on the flat top surface areas, but on a thin letter that area is small: in our example, a quarter of the toolpath. It is worth testing on a copy, and the time adds up. Starting values are in the guide to ironing settings.
Why does the same setting look good on a plate and bad on a letter?
On a plate, almost all of the top is Top surface, made of long, straight lines. On a thin letter, the nozzle makes short curves, and most of the top becomes wall and gap infill, at other speeds. They are different toolpaths on the same layer.
Is it worth changing several things at once to save on prints?
To find the solution, no: if it improves, you don't know which setting did it, and you may carry forever one that only makes the part slow. Use the same plate with different variations, each changing just one thing. That way the test costs one prep and a few grams.